Chapter 6. Getting Online
Normally, PPP accounts are used to dial in to an Internet Service Provider (ISP). Using PPP, which stands for Point-to-Point Protocol, you connect to a large network (the Internet) through your ISP; your machine becomes a part of that network and you use the resources of the network.
Both GNOME and KDE offer useful tools for establishing and modifying PPP accounts to ISPs. These utilities remove much of the guesswork in creating an online connection; in many cases, your only requirement is a valid Internet account.
The utilities -- RP3 for GNOME and Kppp for KDE -- can be interchangeable, too. You can use RP3 to set up and connect in KDE; similarly, you can use Kppp if you're using GNOME.
If you use RP3 or Kppp outside of their respective environments, however, you will lose the ability to dock the running applications. That means you won't be able to integrate RP3 into the KDE Panel, for example -- or Kppp in the GNOME Panel. When they're docked on their Panels, both utilities provide information about your connection, such as connection time, speed of the connection and more. You will be able to minimize these utilities on the Panel, however.
Note, also, that if you create an account in GNOME with RP3, but would rather use Kppp, you'll have to set up your account again in that application; in other words, information you enter in one application won't be available to the other application.
 | You must be root |
|---|---|
Because you'll be making changes to your system, you must be root in order to create a PPP account. If you're in your user account, you'll be asked for your root password before proceeding in either RP3 or Kppp. |
Your own ISP may have specific connection requirements for their service which differ from the instructions in this chapter. Before connecting with either of these tools, check first with your ISP for any specific instructions that they provide, including the following information:
The phone number that your machine must dial into at your ISP.
Your login name and password for the Internet account.
Possible gateway address: Some ISPs may require you to specifically type in the address for the ISP's gateway.
DNS entries: DNS means Domain Name Service. The DNS tracks IP (Internet Protocol) addresses; each computer connected to the Internet must have an IP address, which is a unique set of numbers like 2xx.2xx.2x.2. You may receive one or more DNS entries from your ISP when you sign up. Both RP3 and Kppp provide spaces for you to enter these numbers.
Using RP3 to Connect
RP3, the Red Hat PPP Dialer utility, can make easy work of connecting to the Internet or to some other network devices. You can use RP3 to connect your modem to a PPP account, and then you can view statistics about the connection, such as the time, speed and cost of the current connection.
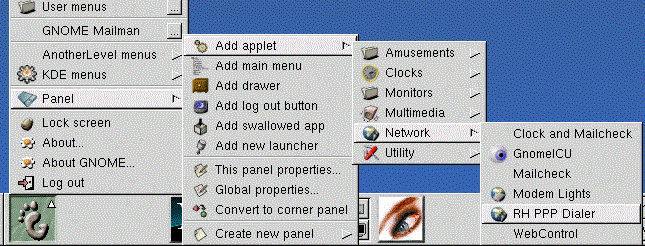
You can start RP3 by going to the GNOME Main Menu Button => Panel => Add applet => Network => RH PPP Dialer (see Figure 6-1). The application will then dock into the Panel and remain there until you remove it (by right-clicking on the docked application and selecting Remove from panel).
Another way to start the application and dock it into the Panel is to right-click on the Panel, then go to Add applet => Network => RH PPP Dialer.
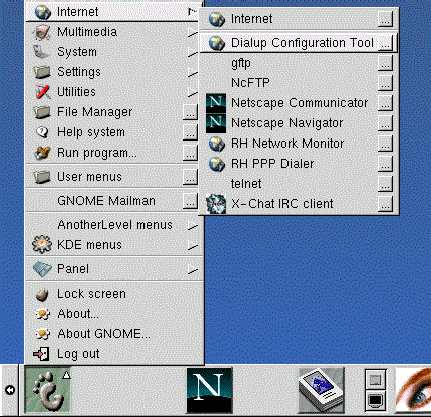
You can also launch RP3 -- without docking it into the Panel -- from either the GNOME Panel (by going to Internet => RH PPP Dialer) or from the shell prompt, by typing /usr/bin/rp3 in an Xterm window.
To see all of your user-controllable network devices, such as modems and Ethernet cards, from the Main Menu Button go to Internet => RH Network Monitor. Similar to the two previous methods, the application will appear on the desktop, rather than docking onto the Panel.
RP3's Dialup Configuration Tool dialog (see Figure 6-2) allows you to easily configure your system for an Internet connection, helping you to locate your modem, enter the account information and connect.
Creating a New Internet Account
To create a new PPP account, start RP3. Go to Main Menu Button => Internet => Dialup Configuration Tool.
Next, type your root password when you're prompted and click the OK button to continue to the opening screen for the Add New Internet Connection tool.
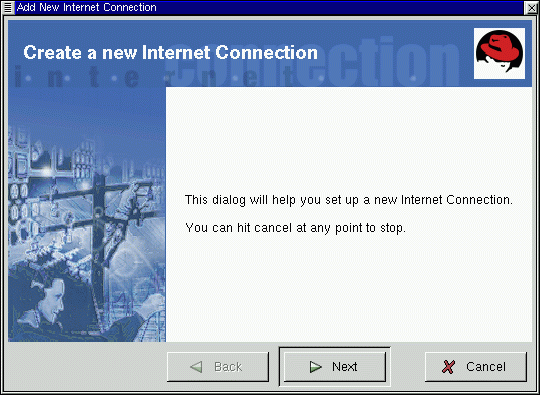
If you don't already have devices configured, you'll see the Add New Internet Connection dialog (see Figure 6-3).
 | If devices are detected |
|---|---|
If there are devices detected, such as an Ethernet card, you can simply choose a listed device so that the application is running on the Panel or the desktop, as in. Once the application is running, right-click on the application to open the options menu and select Configure PPP. |
To proceed, select the Next button; to quit the utility without making any changes or additions, use the Cancel button. You can cancel without saving changes at any time during the process. You can also return to a previously completed screen by using the Back button.
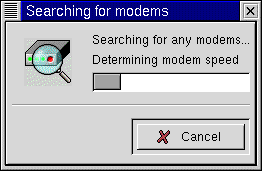
Your next task is to configure a modem. RP3 will try to automatically detect a modem on your system (as in Figure 6-4).
If your modem isn't detected during the search, you'll receive a message stating that it couldn't be found.
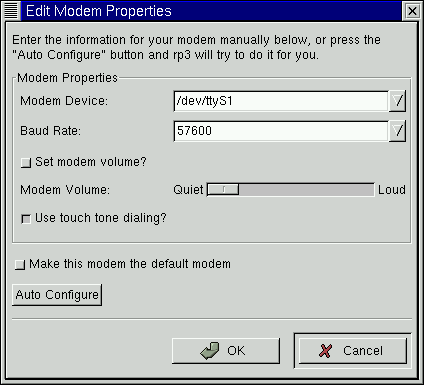
You can still enter details about your modem's location, speed and other information, in the Edit Modem Properties dialog, as in Figure 6-5. This dialog will appear if no modems were detected on your system. Refer to your modem manufacturer's documentation for specifics to enter here.
 | What are Winmodems? |
|---|---|
If your machine uses a modem which relies on software drivers for some of its functionality, you've probably got a "Winmodem." Because they depend on Windows-based software to operate correctly, these types of modems don't function in Linux. To find out more about this subject, go to http://www.o2.net/~gromitkc/winmodem.html |
In the Edit Modem Properties dialog, you can specify the location of your modem, its baud rate, your preference regarding the speaker volume during a call and whether to use Touch Tone dialing.
Although RP3 attempts to detect the correct port, you can adjust the settings here.
If you know that your modem is attached to COM2 under Windows, for example, its location in Linux will be /dev/ttyS1. Here is a comparison of serial line names in MS-DOS (and Windows) and Linux:
COM1 = /dev/ttyS0
COM2 = /dev/ttyS1
COM3 = /dev/ttyS2
COM4 = /dev/ttyS3
Using the drop-down list in the Modem Device box, enter the port to which your modem is connected. Then, in Baud Rate, enter the fastest recommended speed for your modem. Due to most modems' data compression capabilities, select a baud rate that is faster than the modem's advertised speed (a typical 56k device, for example, would have a baud rate of 115200).
You can also select your volume and dialing preferences in this dialog. Dragging the bar to Loud in the Modem Volume entry will let you hear everything that goes on during a connection -- from dialtone to the connection negotiation. Note, however, that some modems will allow only a sound on/sound off configuration, rather than gradations of volume.
The Use touch tone dialing button, when selected, will dial using touch tone; when deselected, you'll dial using pulse.
Check Make this modem the default modem to use your current modem settings each time you run RP3.
You can also rescan your system for modem information by selecting the Auto Configure button, then choose to keep the settings it finds.
Once you're satisfied with your settings, click on Next to proceed to the following screen.
 | Tip |
|---|---|
Even if your modem is automatically detected, you can adjust the modem's settings by choosing to Manually create a modem after RP3 detects your device. Your choices, such as location of modem, baud rate and volume, will be identical to those you'd find if the modem had not been detected. |
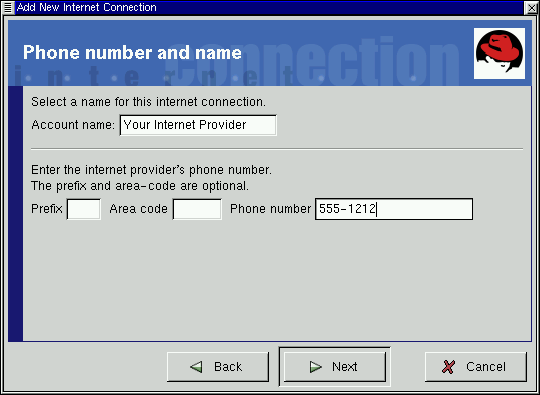
In the Phone number and name dialog (see Figure 6-6), you should enter both the name you would like to give your account and the telephone number of your ISP. Usually, it isn't necessary to provide the prefix or area code for your ISP.
If you must dial a "9" to reach an outside line, enter this number in the Prefix field. To disable call waiting, type *70 in this field.
 | To learn about other options |
|---|---|
RP3 uses an application called Wvdial for some of its functions, such as dialing and authentication with the PPP server. To learn about other dialing options which might be available, type man wvdial in an Xterm window. (Use the Space bar to move forward through this document a "page" at a time; use the B key to move back, and use the Q key to quit.) |
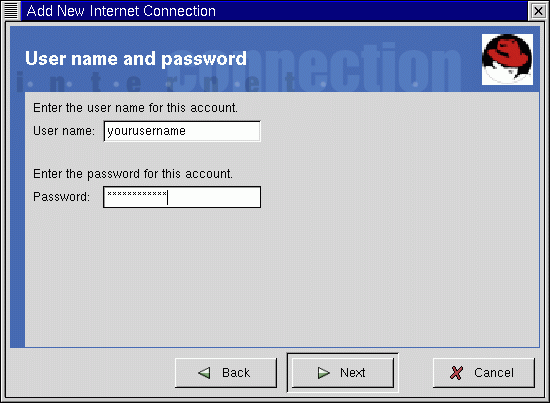
The dialog which follows, User name and password, asks you to provide the name you use to sign on to your ISP, as well as your login password for the service. Your password will appear as a series of asterisks (see Figure 6-7).
In the Other Options dialog, you can choose a pre-selected ISP or a Generic Account if your ISP isn't listed. If your ISP is listed, you should select the appropriate entry, due to variations in connection protocols which require specific network negotiations between your system and your ISP's.
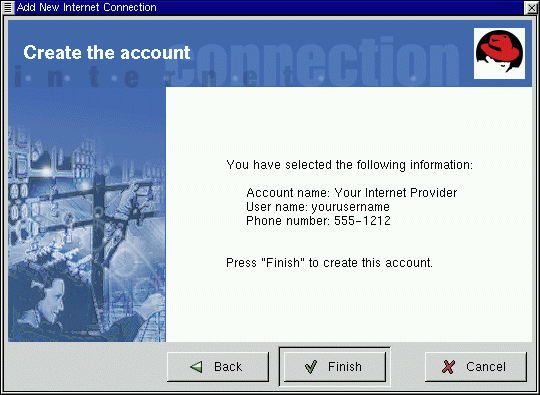
You can check your information in the Create the account dialog which follows (see Figure 6-8).
If you're satisfied with your entries, click Finish to create the account; if you want to modify the information, select the Back button to go to a previous screen.
The configuration tool modifies multiple files. The main files which are affected are /etc/sysconfig/network-scripts/ifcfg-ppp* and /etc/wvdial.conf. If you find it necessary to modify an existing entry, however, you can edit that entry with RP3, rather than hand-edit a file. See the section called Customizing and Configuring for more information on customizing the settings.
Connecting and Disconnecting
Once you have configured your PPP account, start RP3 (right-click on the Panel => Add applet => Network => RH PPP Dialer).
When the application starts, you'll be asked to select which interface you want to activate; choose the name of the PPP service you created.
To begin your online session, left-click on the monitor and, in the dialog which asks whether you want to start the interface, select Yes. (You can also right-click on the monitor, then drag your cursor to the Connect to... entry showing your ISP account name.)
Similar to the procedure for connecting, you can disconnect from your session by left-clicking on the monitor, then choosing Yes to stop the interface. (Also, you can use the Disconnect from... entry by right-clicking on the monitor.)
Working with the RP3 Monitor
When the RP3 monitor is docked on the Panel, it will look like Figure 6-9.
During the time you're connected, the RP3 monitor will display two bar graphs showing connection activity: the top graph will show data transmitted, and the bottom graph will show data received (see Figure 6-10).
Beneath the graphs, you'll find text entries which will display the bytes received per second and either your total connection time or the total cost of your current session (if you've specified this option when you configured the account).
Customizing and Configuring
RP3 makes easy work of setting up an Internet account, but you may still find you've got a little tweaking to do before you're up and running.
By default, when RP3 connects to your ISP, it starts pppd. What is pppd? It means Point-to-Point Protocol daemon; briefly, it helps your machine to "shake hands" with your ISP.
 | To learn more about pppd |
|---|---|
You can learn more about pppd by reading its man page. At the shell prompt, type man pppd. |
You can customize and configure account information by right-clicking on the RP3 monitor and selecting the Configure PPP entry.
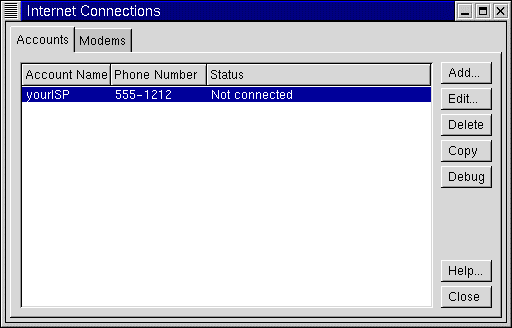
In the Internet Connections dialog which appears, you can add a new account, delete an account and modify current account configuration. You can also debug the account, meaning that you can test your settings to see if there are any problems.
Selecting the Add button will begin the Configure PPP tool, allowing you to enter new account information.
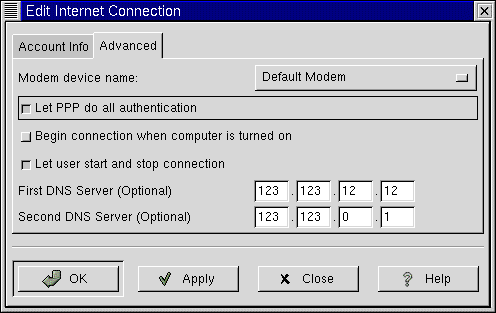
If you choose to modify details in a current account, select the Edit button. When the Edit Internet Connection dialog opens, you can change account details in the Account Info tab. Among the fields you can modify are your login name, your password, and your ISP's telephone number.
If your ISP provided you with DNS numbers, which may be necessary for a successful connection, you can enter them in the Advanced tab of this dialog (see Figure 6-12 for an example).
Among other options in the Advanced tab, you can select whether you want people who have user accounts on your system to be able to connect and disconnect. You can also choose whether you want to start your connection when your machine starts (Begin connection when computer is turned on).
The option Let PPP do all authentication will cause pppd to start immediately upon a successful connection. Learn more about this a little later, in the section called Troubleshooting.
In the Modems tab of the Internet Connections dialog, you can specify the location of your modem (such as /dev/ttyS1). You can either type in the information, or click on the Find Modem... button, which will attempt to automatically detect your modem.
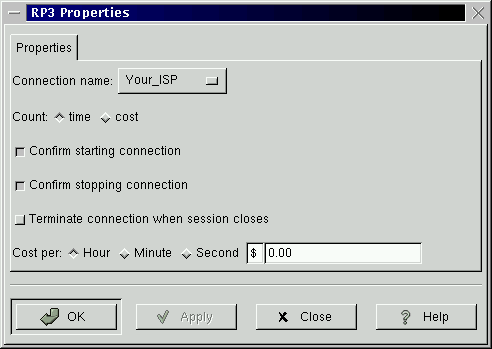
You can determine how you want to view some details about your connection status. To change the default settings, right-click on the application while it's running and, in the menu which appears, left-click once on Properties.
In the Properties dialog (see Figure 6-13), you'll find the following entries:
Connection name: Allows you to switch between network connections that you have previously configured.
Count: Allows you to specify whether you want to view your time online or the costs of your online session.
Confirm starting connection: Confirms your intention to start a connection.
Confirm stopping connection: Confirms your intention to stop a connection.
Cost per: If you pay for Internet access by the hour, minute or second, you can specify the cost for your access here. When you're connected, your connection costs will then be reflected on the RP3 monitor.
Troubleshooting
Sometimes, things may not go as well as you'd hoped when you're trying to establish a connection. That's when debugging can come in handy. Briefly, debugging allows you to see a little of what's going on behind the curtain when you're trying to connect.
To start, launch RP3 and open the Accounts tab in the Internet Connections dialog. Now, highlight the account you want to debug, and select the Debug button in the options to the right.
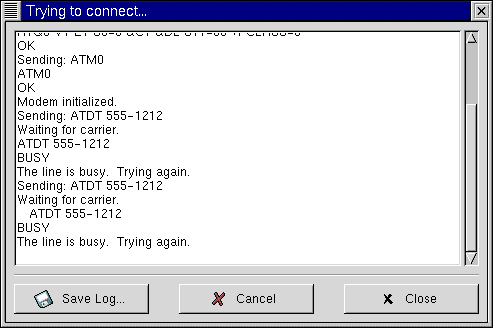
Once you choose to debug the account, you'll see a window similar to Figure 6-14, showing you the commands which are used to initialize your modem, connect to your ISP and perform a login to your Internet account.
The lines may slip by too quickly for you to catch anything unusual. Not to worry: You can scroll through the window to study the information and, for easier review, you can choose the Save Log button to save the contents of the window as a text file, which you can print or open in an editor or word processor.
You may find, for example, that you can connect to your ISP, but you're not correctly logging in. Check first to make certain that you entered the correct user name and password for your account.
It's also possible that the pppd is starting too early, before you have a chance to log in with your name and password. In this case, you appear to be successfully connected, yet when you try to view a Web page with Netscape, you're met with error messages.
If this is the case, stop debugging the connection by selecting Close or Cancel, then return to the Edit feature in the Accounts tab.
In the Edit Internet Connection dialog, select the Advanced tab and deselect the option Let PPP do all authentication. (By default, this option isn't selected when you create an account.) If everything else looks correct, choose OK to return to the Accounts tab.
Now, debug the connection again. You might find that your login procedure goes a little more smoothly, since pppd isn't started immediately, but rather waits until your login name and password are sent to your ISP.
Working with the debug feature can help you whittle down whatever problem might be hindering you from a working connection. When you're finally successful, close the window to stop debugging. Since the debug option is only used to diagnose your setup, it won't maintain your connection to your ISP.
When you've successfully configured your connection, start the interface as described in the beginning of this section.
