Adding Applications and Applets to the Panel
Adding Application Launchers
If you would like to add an Application Launcher (an icon that starts a particular application) to the Panel, right mouse click the Panel and select Add New Launcher from the pop-up
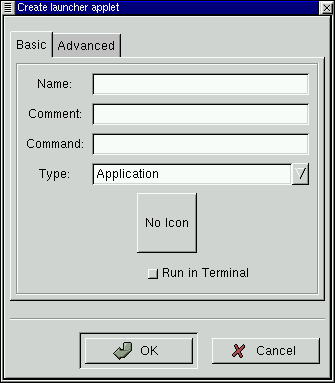
After selecting the Add New Launcher menu item you will see a dialog which will allow you to set the properties for the application launcher you wish to add.
Figure 12-3. The Create Launcher Dialog

In the Create launcher applet dialog you may add a name for your launcher, a comment, the command line to launch the application, and define the application type. You may also press the icon button and choose an icon to represent the application from the icon picker. If no icon is chosen a default icon will be used.
Another, quicker method of adding an application launcher to the Panel is to go into the Main Menu and right mouse click on an application menu item. You will be given another menu selection which contains Add this launcher to Panel. If you select this menu item it will automatically add a launcher for that application to the Panel in which you invoked the Main Menu. At this point you may right mouse click on the launcher and select the Properties menu item to change any options for that launcher.
Grouping Items with Drawers
If you would like to group a subset of applications together you may use a Drawer. A Drawer is simply a small menu-like button that sits on your panel that groups application launchers together is one place. Once you have placed a Drawer on the Panel you may click on it to raise the menu of applications and click again to lower them.
Figure 12-4. An open Drawer

There are a couple of ways to place a Drawer on your Panel. First you may right mouse click on the Panel and select the Add drawer from the pop-up menu. Second, if you want a whole subset of menus from the Main Menu to become a drawer you may right mouse click on the title bar of that menu and select the Add this as drawer to panel from the pop-up menu.
You can add menus to your panel in the same way you add Drawers. Menus are very similar to Drawers except that they do not use large icons to represent application launchers, instead they use a style similar to the Main Menu, i.e. small icons and the application name. You may add a menu by right mouse clicking on the title bar of a menu and select the Add this as menu to panel from the pop-up menu. You may also add system directories to the Panel as menus by dragging a directory out of the GNOME File Manager and dropping it on the Panel.
Adding Applets
There are many applets which you can add to the Panel as well. Applets are small applications which can perform tasks within the Panel itself. There are many applets you can add to the Panel and these are covered in more detail in Chapter 19 of this manual. As an example of how to add an applet you can add another clock applet to your Panel. To add the clock applet to your Panel:
Right mouse click on the Panel
From the pop-up menu choose the Add new applet menu item.
This will bring up more levels of pop-up menus.
Choose the Utility | Clock menu item.
The Clock will be added to your Panel.
Figure 12-5. The Clock Applet

To remove the clock applet you added you can right mouse click on the clock and select Remove from panel from the pop-up menu.