 This is a tip of torx screw driver. You may use a minus screw driver as a su
bstitute, you'd better to get a torx screw driver.
This is a tip of torx screw driver. You may use a minus screw driver as a su
bstitute, you'd better to get a torx screw driver.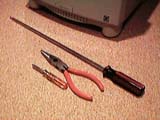 Tools needed
This is a tip of torx screw driver. You may use a minus screw driver as a su
bstitute, you'd better to get a torx screw driver.
At fist, you have to set up new HDD.
At least, you must establish a SCSI ID and a terminator.
 There are jumper switches on the side of an HDD circuit board.
Pins A0, A1, A2 express the SCSI ID as a binary number.
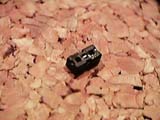 SCSI ID is established by installing jumper-tip.
The table below shows the relationship between jumpers and ID number.
| SCSI ID | ||||||||
|---|---|---|---|---|---|---|---|---|
| 0 | 1 | 2 | 3 | 4 | 5 | 6 | ||
| HDD board | A0 | * | * | * | ||||
| A1 | * | * | * | |||||
| A2 | * | * | * | |||||
Apply a jumper tip on each *.
SCSI ID Zero is coded with no jumpers.
 A terminator will be enabled by setting a jumper switch or installing on-boa
rd terminating resistors. You must enable a terminator on when using as a internal drive. You can enable a terminator either setting a jumper switch or installing terminating resistors.
A terminator will be enabled by setting a jumper switch or installing on-boa
rd terminating resistors. You must enable a terminator on when using as a internal drive. You can enable a terminator either setting a jumper switch or installing terminating resistors.
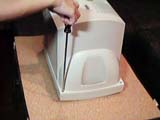 Place a Color Classic on the front bazel. Loosen 4 screws, don't lose them,
though.
Place a Color Classic on the front bazel. Loosen 4 screws, don't lose them,
though.
Lift a rear cover.
 Rear view without a rear cover.
 Zoom up of HDD. (6) is SCSI cable, and (7) is power supply cable.
Speaker cables may prevent you from removing HDD, so put them aside first.
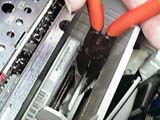
 Remove the SCSI cables with a narrow-tipped plier. Take care not to damage cables.
 (8) is a claw of the carrier. HDD is fixed by hooking this claw on the chassis.
 Remove HDD installed on a carrier from the chassis. HDD is a fixed on the HDD carrier with some screws.
 Pull the claw upward with a narrow-tipped plier and pull the carrier out.
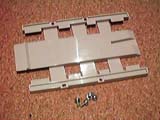 Detach the carrier from HDD loosening 4 screws.
You finished disassembly. Replace a large capacity HDD with old one. The assembly is a quite reverse manner of the disasembly. Do not attach the carrier to wrong direction.